You are now ready to install TrueNAS.
# Installing TrueNAS ## Installing TrueNAS Lots of writing :( ## Networking Assuming you have [created the inter-VM bridge network `vmbr1`](https://wiki.joris.me/books/titan-proxmox-truenas-scale-node/page/preparing-proxmox-for-truenas "Preparing Proxmox for TrueNAS"), we can now connect it to TrueNAS. #### Connect TrueNAS to the newly created bridgeThis step **requires** that you have installed TrueNAS Scale in a VM.
1. Select your TrueNAS VM 2. Go to Hardware 3. Click **Add** 4. Select **Network Device:** [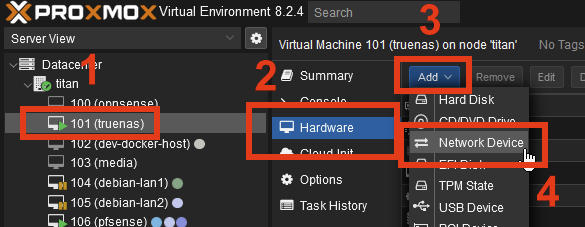](https://wiki.joris.me/uploads/images/gallery/2024-06/5AGIvJUjSzOgmBTC-image.png) 5. Select the newly created `vmbr1` and click **Add**: [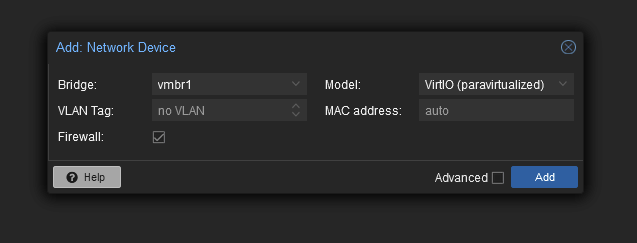](https://wiki.joris.me/uploads/images/gallery/2024-06/FxLnubTUakIreegR-image.png) #### Viewing TrueNAS network configuration 1. Open the TrueNAS web UI using whatever IP address TrueNAS is reachable at. 2. Navigate to **Networking**. It should look roughly like this:[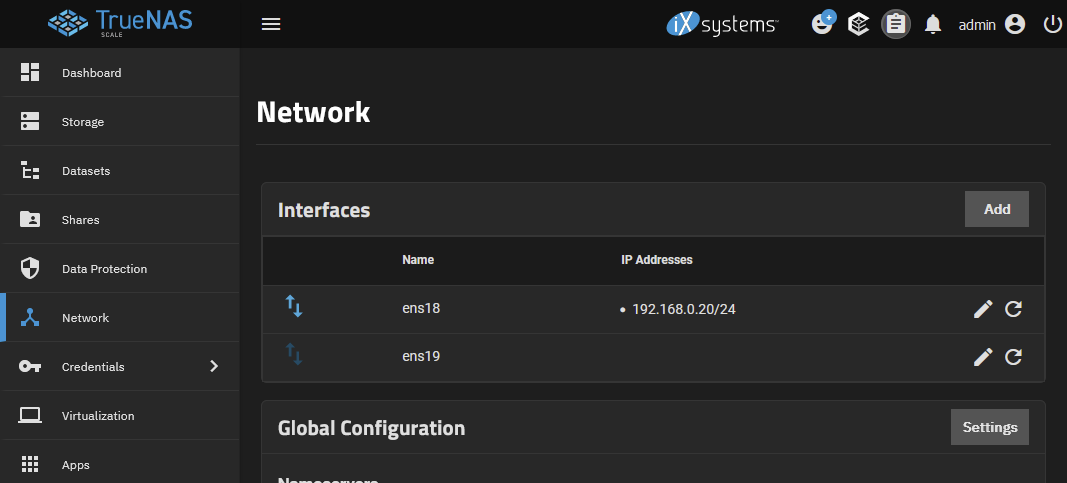](https://wiki.joris.me/uploads/images/gallery/2024-06/ihctIhdWHrPVtFLj-image.png) Primarily, you will now see **two** interfaces. Most likely, **only one** of them will have an IP address assigned already. This is the *WAN*, or the "where TrueNAS gets internet" interface. The second interface however will probably not have any IP address. This is the `vmbr1` inter-VM bridge network we created. #### Configuring the bridge interfaceMake **absolutely** **sure** you do **not** modify the primary network interface, as doing so may make the machine unreachable via network.
Configure the inter-VM bridge to **not** use DHCP, and instead manually assign the IP `192.168.255.20`: [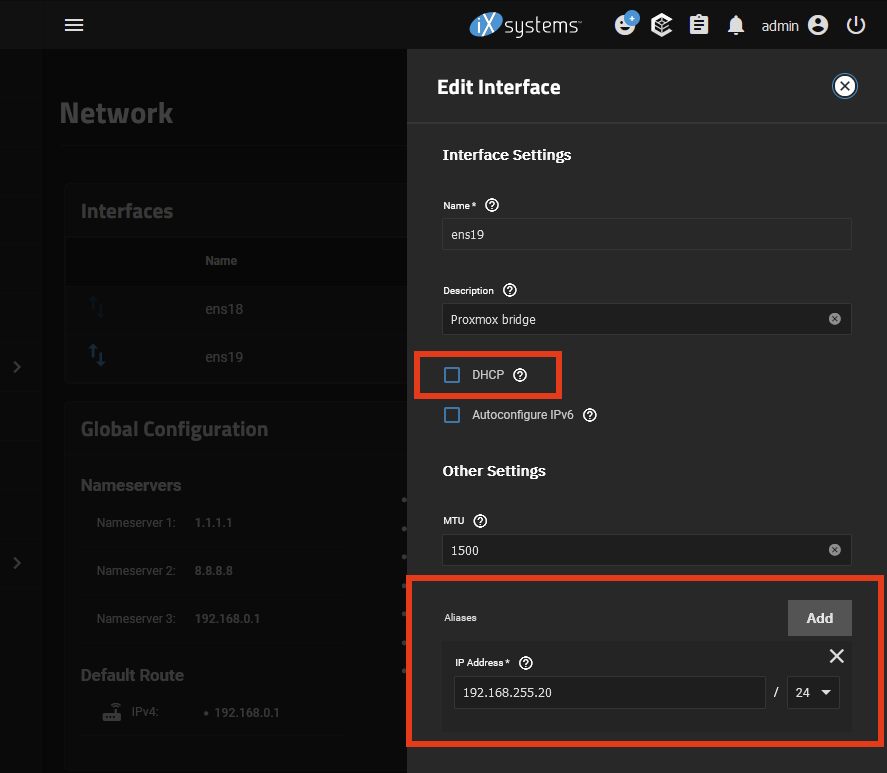](https://wiki.joris.me/uploads/images/gallery/2024-06/XOCcbY5YlkT6jhPA-image.png) Save the settings, click \[Test Configuration\] and then \[Save Configuration\]. ### Summary - We installed TrueNAS Scale in a VM; - We connected TrueNAS to our dedicated network bridge `vmbr1` that will let Proxmox access TrueNAS directly.Good work!
# Networking TrueNAS Assuming you have [created the inter-VM bridge network `vmbr1`](https://wiki.joris.me/books/titan-proxmox-truenas-scale-node/page/preparing-proxmox-for-truenas "Preparing Proxmox for TrueNAS"), we can now connect it to TrueNAS. ### Connect TrueNAS to the newly created bridgeThis step **requires** that you have installed TrueNAS Scale in a VM.
1. Select your TrueNAS VM 2. Go to Hardware 3. Click **Add** 4. Select **Network Device:** [](https://wiki.joris.me/uploads/images/gallery/2024-06/5AGIvJUjSzOgmBTC-image.png) 5. Select the newly created `vmbr1` and click **Add**: [](https://wiki.joris.me/uploads/images/gallery/2024-06/FxLnubTUakIreegR-image.png) #### Viewing TrueNAS network configuration 1. Open the TrueNAS web UI using whatever IP address TrueNAS is reachable at. 2. Navigate to **Networking**. It should look roughly like this:[](https://wiki.joris.me/uploads/images/gallery/2024-06/ihctIhdWHrPVtFLj-image.png) Primarily, you will now see **two** interfaces. Most likely, **only one** of them will have an IP address assigned already. This is the *WAN*, or the "where TrueNAS gets internet" interface. The second interface however will probably not have any IP address. This is the `vmbr1` inter-VM bridge network we created. #### Configuring the bridge interfaceMake **absolutely** **sure** you do **not** modify the primary network interface, as doing so may make the machine unreachable via network.
Configure the inter-VM bridge to **not** use DHCP, and instead manually assign the IP `192.168.255.20`: [](https://wiki.joris.me/uploads/images/gallery/2024-06/XOCcbY5YlkT6jhPA-image.png) Save the settings, click \[Test Configuration\] and then \[Save Configuration\]. ### Summary - We installed TrueNAS Scale in a VM; - We connected TrueNAS to our dedicated network bridge `vmbr1` that will let Proxmox access TrueNAS directly.Good work!