Bootstrapping
How to get Proxmox and TrueNAS running from zero.
Installing Proxmox
This page walks through setting up Proxmox, preparing it for TrueNAS and recovering all VMs.
Install Proxmox
Prepare the installation media
- Install Rufus: https://rufus.ie/en/
- Download the latest version of Proxmox (google "proxmox iso")
- Grab a USB drive of about 32GB or larger.
- Use Rufus to flash the Proxmox ISO to the USB drive.
Install Proxmox
Generally, just follow the questions on screen. When asked what drive to install to, select the smallest one. The system usually has multiple harddrives and multiple SSDs, but the boot SSD should be the odd one out.
Configuring Proxmox
Networking
What we will be setting up is two bridge networks. One is vmbr0,
Preparing Proxmox for TrueNAS
Introduction
This page walks through setting up networking in preparation for TrueNAS.
Prerequisites
Your setup before is expected to be:
- The machine is physically connected to some form of upstream internet;
- The only network bridge that currently exists is the default
vmbr0.
Steps
Creating the inter-VM network bridge
To allow virtual machines to communicate safely, we will be creating a new bridge vmbr1. VMs that require direct communication with each other with no additional routing in between them will use this bridge to talk to each other.
- Select your Proxmox node.
- Go to System > Network
- Click Create > Linux Bridge:

- A popup should appear. Fill it out like so:

The IPv4 we set here is the address at which the Proxmox node itself will be reachable on this bridge. If left empty, it will not be reachable by VMs. - Click Create.
-
Apply the changes:

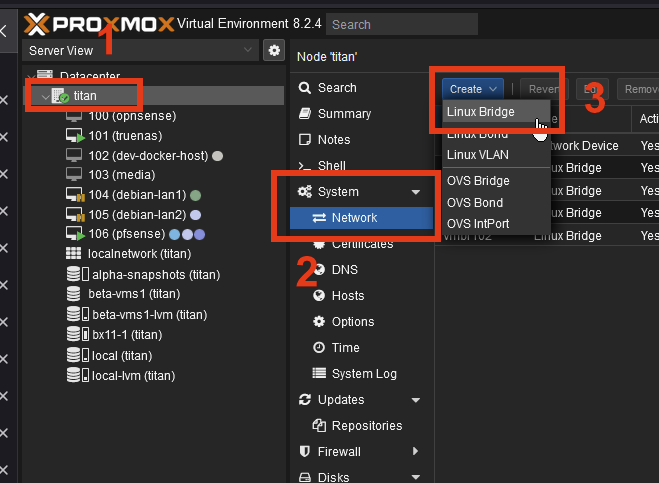
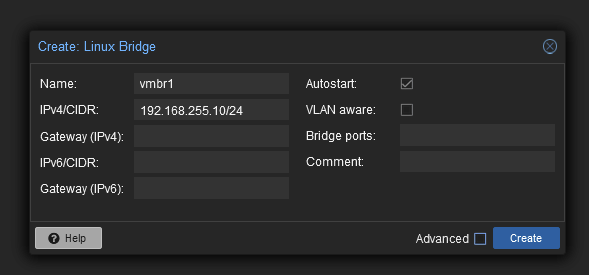
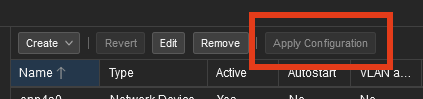
The inter-VM network bridge is now created, and Proxmox itself is reachable on the bridge via the address 192.168.255.10.
You are now ready to install TrueNAS.
Installing TrueNAS
Installing TrueNAS
Lots of writing :(
Networking
Assuming you have created the inter-VM bridge network vmbr1, we can now connect it to TrueNAS.
Connect TrueNAS to the newly created bridge
This step requires that you have installed TrueNAS Scale in a VM.
- Select your TrueNAS VM
- Go to Hardware
- Click Add
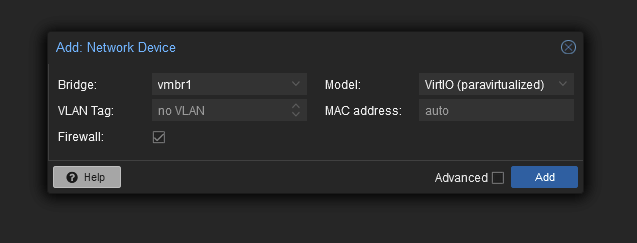
- Select Network Device:

- Select the newly created
vmbr1and click Add:

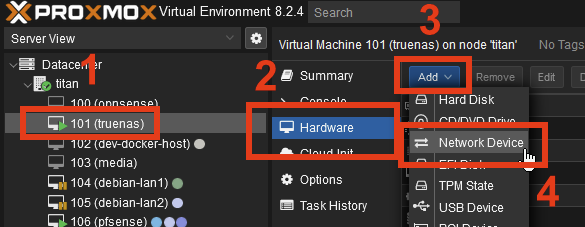
Viewing TrueNAS network configuration
- Open the TrueNAS web UI using whatever IP address TrueNAS is reachable at.
- Navigate to Networking. It should look roughly like this:

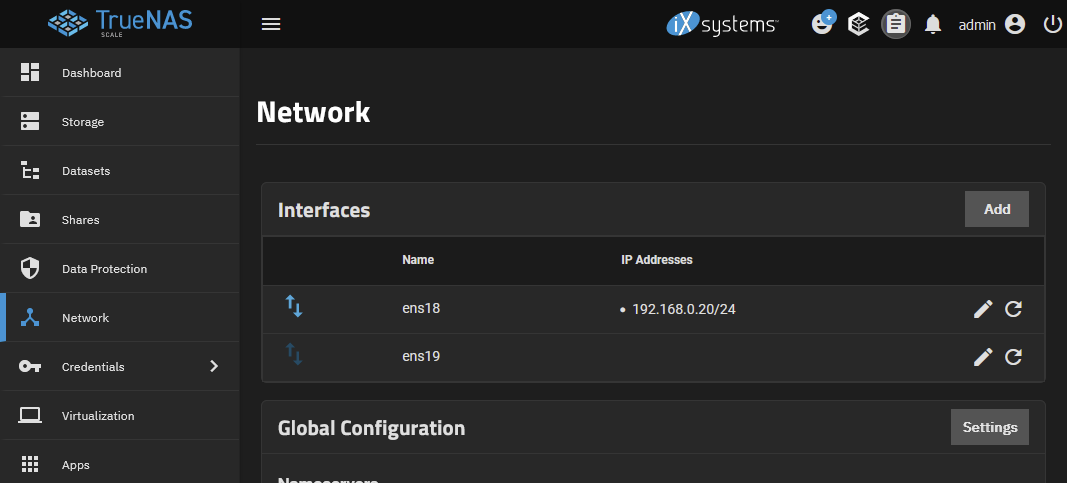
Primarily, you will now see two interfaces. Most likely, only one of them will have an IP address assigned already. This is the WAN, or the "where TrueNAS gets internet" interface.
The second interface however will probably not have any IP address. This is the vmbr1 inter-VM bridge network we created.
Configuring the bridge interface
Make absolutely sure you do not modify the primary network interface, as doing so may make the machine unreachable via network.
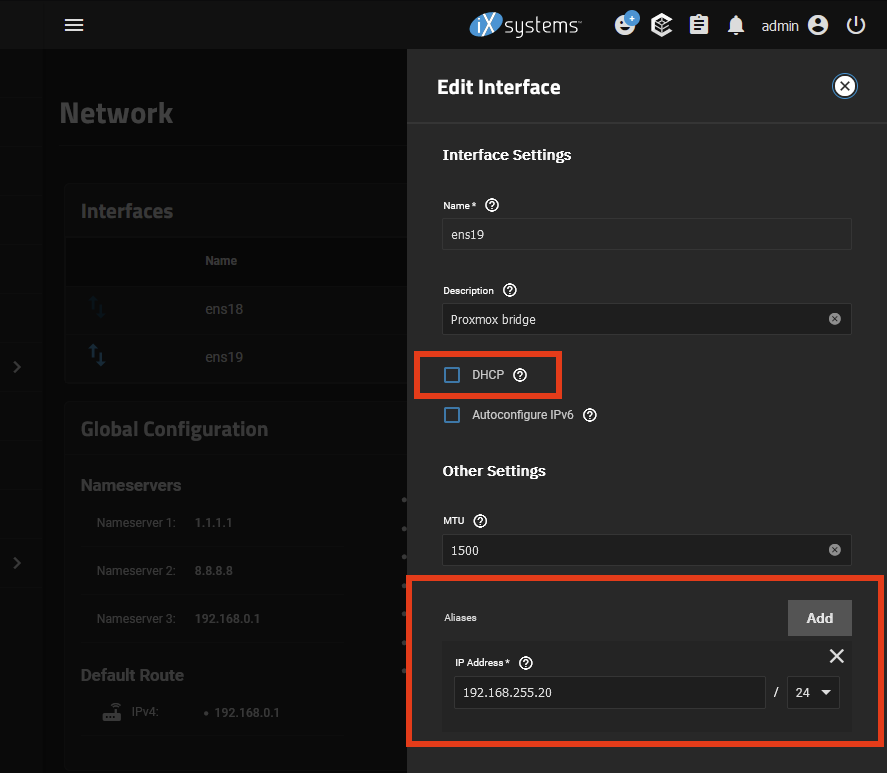
Configure the inter-VM bridge to not use DHCP, and instead manually assign the IP 192.168.255.20:
Save the settings, click [Test Configuration] and then [Save Configuration].
Summary
- We installed TrueNAS Scale in a VM;
- We connected TrueNAS to our dedicated network bridge
vmbr1that will let Proxmox access TrueNAS directly.
Good work!
Networking TrueNAS
Assuming you have created the inter-VM bridge network vmbr1, we can now connect it to TrueNAS.
Connect TrueNAS to the newly created bridge
This step requires that you have installed TrueNAS Scale in a VM.
- Select your TrueNAS VM
- Go to Hardware
- Click Add
- Select Network Device:
- Select the newly created
vmbr1and click Add:
Viewing TrueNAS network configuration
- Open the TrueNAS web UI using whatever IP address TrueNAS is reachable at.
- Navigate to Networking. It should look roughly like this:
Primarily, you will now see two interfaces. Most likely, only one of them will have an IP address assigned already. This is the WAN, or the "where TrueNAS gets internet" interface.
The second interface however will probably not have any IP address. This is the vmbr1 inter-VM bridge network we created.
Configuring the bridge interface
Make absolutely sure you do not modify the primary network interface, as doing so may make the machine unreachable via network.
Configure the inter-VM bridge to not use DHCP, and instead manually assign the IP 192.168.255.20:
Save the settings, click [Test Configuration] and then [Save Configuration].
Summary
- We installed TrueNAS Scale in a VM;
- We connected TrueNAS to our dedicated network bridge
vmbr1that will let Proxmox access TrueNAS directly.
Good work!